Smoothwall Firewall project

Showing posts with label linux. Show all posts

Wednesday, 26 August 2015

Using S3cmd to list the ACL's of all the files in an S3 bucket


In the absence of any replies from the S3cmd forum, I managed to use a command line hack to get the ACL status of all files in a bucket with this:

 I tried parsing the whole bucket with an "astrix" as an option , but that didn't work with version 1.0.1 or 1.0.5 of S3cmd. 

s3cmd -c ~/.s3cfg_uk2 ls s3://test-hubs/ | awk '{print $4}' | sed 's/s3\:\/\/test-hubs\///g' | xargs -I file s3cmd -c ~/.s3cfg_uk2 info s3://test-hubs/file 

 This is all on one line - and the xargs option is a capitol "i" and not an "el" as it appears here ;-) If anyone can see how to refactor this to make it more efficient be my guest, but it works.

Or indeed answer my original question with a snappy command line option to s3cmd ;-)


If you want to see if there is "anyone" access to a file you will see "anon" as the ACL setting , so you can search on that if you want to look for globally available files - which is what I wanted to do.

Thursday, 11 June 2015

VM created by boot2docker init does not have DNS set up correctly - heres how to fix it

I came across this problem while setting up Docker on my OSX environment , and after searching the web , I found a method that works well, and cures the problem. Basically once the Virtualbox VM is created you need to edit the network adapter drivers and set them to "PCNET-FAST III" instead of the paravirtualised drivers. You need to do both adapters, and then restart boot2docker. You will notice that you get the correct settings now in your /etc/resolv.conf file. This was annoying me, and meant I had to reset the settings in the above file everytime I start docker - which is not ideal. Hope this saves you some time.

Sunday, 31 August 2014

Using Docker to run rtorrent to reduce your servers resource requirements


Let me state early and clearly , any one who thinks Docker is a new technology, knows nothing about IT and even less about virtualisation. So if some smartalec in your office starts spouting about this new technology, take them down a peg or two with a few links to Solaris containers, OpenVZ or LXC.

What the Docker team have done extremely well, is make these ancient technologies very accessible and very easy to use, with a well defined tool set and API. This they must be highly praised for.

In the words of Einstein however, they work on the shoulders of giants, who did a lot of the heavy lifting, and let us all not forget this.

I have been using containers for years, and we worked on a very successful cloud at Nokia using OpenVZ, where we built our own tools.

So I thought I would give Docker a spin on one of my cloud servers and just kick the tyres to start. I picked an application I use a lot for downloading Linux ISO's so it seemed a good choice. It was very straight forward indeed.

The host operating system was CentOS 6.5 - which I'm growing less fond of as each week passes, as in the fast moving cloud space, Ubuntu is simply better. It was installed however, and I couldn't be bothered to change it. You need to enable the EPEL repository and install docker with yum.

I decided to download and use the userland tools of a Docker Ubuntu image - but whatever image you choose - the host kernel is the one that will be used. This is to do with the historically well thought out ABI built into the Linux kernel that allows this all to work.


Once the image was retrieved from the Docker registry - I fired up a container with Ubuntu 14.04 tools and installed screen, rtorrent , vim and htop.

I always run rtorrent with screen so I can just leave it running and come back to it when required. Also importantly - when starting your container use /bin/bash so you can have an interactive session with it to be able to go back and check your screen/rtorrent session. A command like the following will do.

docker run -i -t my-ubuntu-image /bin/bash

Be care however when you want to exit this container , DON'T type exit but CTRL-p, CTRL-q , so everything keeps running and you can reattach to the container when you wish to check on progress.

This uses significantly less resources than spinning up a KVM virtual image to do the same job, as it uses the resources of the host system that are already running.

I have deliberately not put all the commands need to do this here , as the Docker documentation is good and very clear, so duplication is pointless


Wednesday, 30 April 2014

Problem loading/starting a KVM virtual machine on a CentOS 6.5 host that has SELINUX disabled


If you have recently built a KVM host for all your virtual machines and left SELINUX enabled, then all will be well, but what happens when you turn that setting off. Well you will end up with VM's that won't load with the error message

error: Failed to start domain Ubuntu1404
error: unsupported configuration: Unable to find security driver for label selinux


It is easy to fix , use the following command and just remove the seclabel section on the virtual machine domain XML - virsh edit Ubuntu1404

# virsh edit Ubuntu1404
...
  <;seclabel type='dynamic' model='selinux' relabel='yes'>;
    <label>system_u:system_r:svirt_t:s0:c95,c664</label>
    <imagelabel>system_u:object_r:svirt_image_t:s0:c95,c664</imagelabel>
  </seclabel>  

Once you have done that, the domains will load as normal.

Make sure if you have backup's of the domain XML, they are also changed, as I have found that they will over write the domain if your not careful

Check in /etc/libvirt/qemu to make sure the changes have happen, and the XML has been updated.

Wednesday, 12 March 2014

Setting up Adobe Flash with Wine and Windows Firefox on Linux - all to get VMware vSphere working in a browser


As I regularly need to use vmware software for a lot of cloud implementations , it has become more of a pain to keep switching to a virtual machine just to allow me to use a later version of Flash, that Adobe no longer supports in Linux. This is because VMware in their wisdom have decided that the web version of vSPhere management will only work with Flash version 11.5 and above.

So I decide today to do something about it, and make it easier.

Here are the steps to get it working.

1) Install wine from your Distros repos - or download the latest from WineHQ

2) If you are behind a proxy make sure you have http_proxy set - if this doesn't work then use this util to set the proxy in Wine - Proxycfg.exe - links at bottom
e.g. wine Proxycfg.exe -p http://myproxy-server.co.uk:8080

3) Download and install a Windows version of Firefox from the link below
e.g. chmod u+x Firefox Setup 27.0.1.exe ; wine  Firefox Setup 27.0.1.exe

4) Download the version of Adobe flash I point to in the links - don't go to the Adobe page it doesn't work for me.

5) Run the command "wine install_adobe_flash_11_plugin.exe" and just follow the instructions.

6) Start up firefox with wine, and heh presto you can now connect to the vSphere console, and go to other Adobe sites if you like.

Hope this saves people time when trying to do the same.

Latest stable Windows version of Firefox

Copy of the Proxycfg.exe file for configuring wines proxy settings

The version of Adobe Flash I found to work with Ubuntu 12.04 - wine version 1.4

Wine help on how to use Proxycfg.exe - search page for proxy

Friday, 5 April 2013

Using an encrypted git repository on Dropbox to store my puppet code in the Cloud.


Today, most technologists have said they love the cloud storage paradigm and to have files and configs at their finger tips , no matter where they are , or how they access them.

Dropbox was arguably the first, easiest and globally available cloud storage solution out their, and it's the one I continue to use today. Like all cloud solutions - apart from owncloud - they have one drawback, who else can look at your files? This tends to make users suspicious and cautious about what they are prepared to store in the cloud, me too. As I control various ssh keys with my puppet code, I certainly don't want people having access to these.

So the solution I found was Truecrypt - a great open source project that allows you to create encrypted  volumes that you can mount on all popular operating systems, including Linux, OSX and Microsoft. As I use all three of these systems at various times, it gives me great coverage. In the post PC era, it would be nice to see IOS and Android versions available in the future, but in all honesty I have not seen a real need yet.

My purposes only required a small amount of space, as code does not generally take up too much room, so I only made it 10MB. Your mileage may vary of course. There are good tutorials on the Truecrypt web site, and if you like what you see, then please donate to the project.

Once Truecrypt has been installed , created your volume and you have mounted it , you can now create your git repository using standard git commands like so:

git init --bare project.git

You can then take the project you have been working on your local hard drive, and commit it to your new git repo, like so

git remote add origin /media/truecrypt1/git/project.git
git push -u origin master

That's all there is too it, so now I have my puppet git repository where ever I go, and I can very quickly bring a machine up to my requirements with all the settings and packages I need to get work done with puppet and a few git commands. It literally saves hours of time, and I can rest easy in the knowledge it is safe in the cloud.

You can obviously use Truecrypt for storing all sorts of other things in the cloud, as I do. If you want to make sure only you can see sensitive data then this a good way to go.

Wednesday, 15 August 2012

Using puppet with Virtualbox to speed up client additions install


One of the first things you need to do when you create a new VM is install the client additions code, which offers enhanced networking,screen sizing, cut & paste and general host/client integration. With Centos 6.3 Live CD installs , several of the needed rpm packages that allow the install are missing.

I have a puppet master installed and configured - which is beyond the scope of this post - but if you need help doing that, then just buy or download the Pro Puppet book, which covers this topic very clearly for any operating system.

Pro Puppet book

Make sure every machine can resolve all DNS entries properly , either with a DNS server or by hosts files - if you must. Every machine needs to resolve puppet.mynetwork.com and puppet.

You also need to install ruby , ruby-libs ,ruby-shadow , puppet and facter or you won't be able to connect to the puppet master in the first place. You can do this as part of your post-install kickstart or manually. You will also need to add the Fedora mainatained EPEL repo to get the latest versions of these.

The important elements that you need to install are make, gcc and kernel-devel and I also always add vim.

You need to define each of these in the modules sections under /etc/puppet/modules  on the puppet master with their own directory structure of:

/etc/puppet/modules/make/files
/etc/puppet/modules/make/manifests
/etc/puppet/modules/make/templates

Within the manifests directory you need to add an init.pp, and for vim it will look like this:


class vim {
package { vim-enhanced:
ensure => present,
}
}


You can obviously do a lot more in these files, but this is just to show what is needed for this task.

You also need to make sure you include these modules in the node.pp file in the /etc/puppet/manifests directory. Like this:


node /^testmac\d+\.mynetwork\.com/ {
        include vim
        include make
        include kernel-devel
        include gcc
}

The guest server in my environment follows this naming scheme and the regular expressions allow you to have as many as you like.

To connect your new VM  to the puppetmaster you can run the following command and make sure that  the certificate is allowed on the server:

puppet agent --server=puppet.mynetwork.com --no-daemonize --verbose

Once the client server has the cert's installed correctly, then run this command again to auto install all the rpms needed for you to install the client additions. The client additions can be installed from the GUI or the command line, which ever you prefer.

You can now also manage all your VM's with puppet , and make your virtual dev/test environment a lot easier to manage.


Monday, 18 June 2012

Putting VNC traffic through an SSH tunnel

While setting up ssh tunnels has become a useful way to get work done securely on the command line, there are occasions when a GUI is required. Enter the really useful VNC protocol for being able to remotely access a Linux machines X windows system. So how is this done, well I think a little diagram will help to explain the idea, and then some steps to get it done.


Well, how do we get this done. Read my previous article on how to set up tunnels using SSH, and once you have that up and running we can set up the VNC servers. Using Centos 6.2 as the server to connect to internally, running Gnome, install Tigervnc server and edit the /etc/sysconfig/vncservers and set your X session size, display port numbers and we wish to tell it to listen only to localhost. This is for security, we don't want it to respond to VNC on the actual IP address of the server.
Example:
VNCSERVERS="1:nhaddock"
VNCSERVERARGS[1]="-geometry 1024x768 -localhost"
Start the vncserver , which will now be listening on port 5901 on localhost. Next off to the remote machine, where we need to set up the SSH config file so that it tunnels all VNC traffic through the SSH tunnel Go into .ssh/config and add the following for the remote user/machine

Host ext.server*
#HostName ext.server
User joeblogs
UserKnownHostsFile ~/.ssh/known_hosts.d/companyx
LocalForward 5901 localhost:5901
ProxyCommand ssh -A server.in-the-cloud exec nc localhost 10022


The key things to take away from this config, is that you need to add an entry in your /etc/hosts file for the ext.server IP address. We are going to forward all traffic for VNC - port 5901 into the tunnel once it is established using Localforward, and the proxy command uses netcat (nc) to push all the traffic down the reverse tunnel port it will find from your previous set-up with the reverse tunnel. So now just ssh to ext.server, and once you have made your connections, use a VNC viewer to connect to localhost on port 5901, and voila you now have an X session on the internal server.

Here are some pictures of the outcome.


Sunday, 15 April 2012

eSATA , Thunderbolt or USB3, that is the question?


As with all things technological , when a standard comes to the end of it's life there will always be more than one way to move forward.

So it is with the demise of USB2 and Firewire, which have basically come to the end of their usefulness, when you look at the size of the external disks we now have , and the size of the data that we wish to move around.

There are three contenders that I can currently see to replace these, and they are USB3, eSATA and Thunderbolt. Now I think that Thunderbolt is a great technology and offers the best performance without a doubt, but currently it only seems to be getting traction in the Apple world, where even here external disk drives are thin on the ground. To compound this scarcity of choices is the fact I live in a multi-machine world, where I have to move data between many machines, which include mainly Linux and even the odd Windows VM.

The PC manufacturers do not seem interesting in this new interface yet, I hope this changes, but I have to deal with the here and now and not what I would like to happen.

I initially started using eSATA as my laptop supported it, and it was reasonably fast and I could run VM's directly from this drive - using a hybrid disks - but it has a big hole in it's usefulness, not every machine has one of these ports, and it is not compatible with anything else. USB3 on the other hand is completely backwardly compatible, and this is where it really wins, as I can use USB3 where I have it , and it can switch back to USB2 when it is not. This has proved more than useful on many occasions while moving files around.I have also noticed that more and more motherboard manufacturers are supporting it, and once it becomes a standard on laptops, then to my mind it is game over. I now see eSATA as more of a bridging technology that became popular due to the absence of the the new USB3 standard.

So with this in mind I have just bought a USB3 PCI-e adapter for my older Desktop server, and I will now compare this performance to the ESATA I have in the laptop and see how I get on. All the benchmark data I have read lead me to believe it will be significantly faster, as it's speed is closer to the 6GB SATA III than the 1.5GB SATA speeds I currently have in the laptop. I will report back.

I always feel on these technology change overs that you need to be careful, so that you make sure you cover your bases and examine the alternatives, but need to make sure your not left holding the new Betamax technology.Anyone still own an HD player when you now wish you had a Blueray player?

There is one other part of the jigsaw that I will right a separate post about, and that is a the filesystem to use to make the external disk truly portable between Mac, Linux and Windows.

Wednesday, 7 December 2011

Issue with git client and Ubuntu 11.10 through corporate proxy


If like me you use git for storing code and configuration files, then it can become a problem when using it through a corporate proxy if you have the wrong versions.

I found today while trying to do a git clone the following error:

emote HEAD refers to nonexistent ref, unable to checkout

After searching around the web I came across this post.

http://goo.gl/hWhXp

This does indeed work.

Basically the problem is that the version of libcurl3 included with Ubuntu 11.10 has problem authenticating through a proxy. You either have to use 11.04 or upgrade your libcurl3 to the version in the next release of Ubuntu(precise), which fixes the issue.

I hope this saves you some effort.

This link also offers URL's to grab the latest deb packages to install, and more back ground on the issue.

http://goo.gl/XIttB

Monday, 5 December 2011

How to add another hard disk to your Xen virtual machine


If like me you have many Xen virtual machines that have been running for a while, you will likely come across the problem of having to increase the disk space, as the services or jobs the virtual machine offers over time changes.

Now you could increase the size of the existing disk, but I always feel that offers a level of risk, which with adding a new disk and using LVM or a new mount goes away.

Ok, so firstly we need to create a new virtual disk on the physical harddisk with the following command:

dd if=/dev/zero of=vm01-disk2.img bs=1G count=50

This will give us 50GB of new space. You can of course change the size to what ever you require, if your physical disk space will allow it.

Then we need to edit the Xen virtual machine configuration file and add in the new disk.

On my virtual machine host this is in /etc/xen/vm01

The line that needs to be altered is obviously the disk line, like so

disk = [ "tap:aio:/opt/xendisks/vm01.img,xvda,w",\
"tap:aio:/opt/xendisks/vm01-disk2.img,xvdb,w" ]


NB Notice the slash which allows the configuration line to expand over two lines in the configuration file.

Once you have done this, you can use the virsh and xm commands to restart the virtual machine , so that the new disk is available inside the virtual machine.

Once your VM has re-booted, you will notice another disk, which you can then either add to your LVM configuration, or just format and mount in a new directory. Here is my new mount as an example.

/dev/xvdb 50G 19G 29G 39% /opt/tomcat

Monday, 31 October 2011

Using the lightweight Fedora LXDE desktop for snappier Virtual machines


While having a look at Fedora 16 beta within Virtualbox virtualization software, I decided to use a more lightweight desktop environment.

Over the last couple of years as hardware has improved the desktop systems that sit on top of X windows have started to become more complex and powerful, but as a side effect have become resource intensive, which is not ideal for virtual machines.

There are many great different types of lightweight desktop environments, but one that is now supported by all the main distributions is LXDE.

Fedora 16 installation was a breeze - though I recommend upgrading Virtualbox to version 4.1.4 before you start for better support.

The lighter desktop has indeed made a massive improvement over speed and repsonsiveness to the Gnome 3 shell I installed on the Fedora 15 image I tested.

The menus and layout my be a little legacy for some, and perhaps for everyday use, but when most of the time is spent in a terminal widow, that is not the end of the world.

Here is a snap of the initial machine once installed.


There are many new features in this release of Fedora, including the latest 3.1 kernel, deltarpms with presto , the use of systemd instead of the now very old SysV daemon management & control and the use of specifically locked ethernet hardware to configuration definitions - so you see p2p1 instead of eth0 for instance.

The final release is only a few days aways, and for people who like cutting edge open source software Fedora is a good choice.

Give it a try and see what you think.

Wednesday, 12 October 2011

The FUD used against Linux , really annoys me


If you are not familiar with the term FUD, it stands for Fear, Uncertainty and doubt, which are more commonly described as lies in technical circles. They are used by marketing people to stop people using others products, just in case.

Over the years I have seen this tactic used many times by large corporations to scare companies into buying their product's, but none have used it more often and more perniciously than Microsoft.

Well, they have tried everything against Linux, and have told lies by the bucket load, yet still the system gains market share, where today you can almost guarantee that if you go somewhere on the web, the server powering that site will be Linux.

I have also used it on my laptops for years, and this summer on holiday put it through it's paces , but taking it with me to do some work while on the road in Spain. It never missed a beat. Every little dusty side street eating house that offered WIFI, I could connect to, I could do whatever I needed, whenever I needed, without fail. The one device that did let me down on occasion was my iPad, rarely, but it did.

So the facts are Ubuntu Linux on my Dell laptop 100% success, Apple iPad 98% success.

I love my iPad, so I'm not making some cheap point about it , but a fact is a fact.

So the next time someone tells you something about Linux, do some research and find out the facts. Linux is not perfect, but then neither are any of the systems offered, but Linux is free and you can laways help make it better.

Less FUD, and more facts please.

Here is a link to try it for yourself.

Ubuntu Linux

Sunday, 3 July 2011

DNSMASQ config on Ubuntu desktop for fast DNS lookups


Here is a quick rundown on how to use dnsmasq as a fast DNS cache. I was driven to set this up, as the DNS servers that my flat company supply are like treacle on a very cold day.

Help on installing DNSMASQ

Install the daemon, and then edit /etc/dnsmasq.conf to listen on port 127.0.0.1. You need to find the line that has #listen-address= and remove the hash and add the address.

Add this nameserver 127.0.0.1 into the top of /etc/resolv.conf file at the top, and restart the daemon. This is where Linux looks for it's DNS servers.

/etc/init.d/dnsmasq restart

Do a DNS lookup like this to test - dig google.com
Look at the time returned, and then do it again, and look at the time difference, a lot faster isn't it.

Advanced fun and games.

If you want to look at the contents of the cache that dnsmasq is curently storing (in memory)then you need add the -q parameter to the startup scipt, just tag it onto the end. The start-up script is in the /etc/init.d directory, and you need to scroll down to the start function. You will see a long list of parameters that get passed, just add the -q to the end.

Then restart the daemon.

To look at the cache we need to send the SIGUSR1 parameter to the kill command to dump the currently held cache into the /var/log/syslog file. Use the following command to do that.

kill -s USR1 1234 - for instance where 1234 is the PID number of the dnsmasq running daemon. You can find that with the ps -ef | grep dnsmasq command.

If you want to add static DNS entries into your cache, edit the /etc/hosts file and add your required , and often used DNS entries in there. These will be read when dnsmasq starts , and will be available immediately without reference to an upstream DNS resolver. So they will be extrememly quick, which is just what I wanted.

For a quick guide on DNS look here.

Quick guide to DNS

Thursday, 30 June 2011

Using rtorrent on a remote Centos server for 24/7 downloads


As I'm sure you all know a lot of information is passed around the Web using bittorrent. Most of the clients have a nice GUI front end that allow you to easily grab the torrent files and start downloading.

What if you don't have a GUI on the machine you wish to use, or what if this is to be a 24/7 service for you. Well Linux as always has solutions, and one of those is a program called rtorrent. If you only like flashy interfaces this is not for you, but it works perfectly, and is very reliable.

I use a Centos 5.6 virtual server in the cloud for all sorts of uses, like a socks proxy and an SSL endpoint, and this is where I wanted to run the client. This machine is not very powerful, so you don't need to worry on that score. There are many Linux virtual machines you can obtain these days, for not a great deal of money.

Firstly, you need to visit this web site and download three RPM's.
Site for RPMS

libsigc++20-2.0.17-1.el5.rf.x86_64.rpm
libtorrent-0.12.6-1.el5.rf.x86_64.rpm
rtorrent-0.8.6-2.el5.rf.x86_64.rpm

Now, depending on how you configured your machine, there may be other dependencies, so check when you install these as follows

rpm -ivh *.rpm

Once this is done, I would then also make sure that the "screen" application is installed, as this will allow you to start rtorrent on the remote server, and re-connect to it when you desire. Spend a few moments looking at "screen" commands on the web to understand how it fits together - like here.

Using Screen

So now, I run screen and then I run rtorrent.

Once rtorrent is loaded, read this web page for an excellent quick guide to using the application:

How to use rtorrent as pro

Once you have your torrent running, you can detach from your screen session, with the CTRL-A d command. You can now logout of remote server, and all is still running.

To re-connect, you just login to the remote server again, and then run screen -r, and you will be back looking at rtorrent happily running.

This is very useful for downloading Linux ISO distribution files etc.

Saturday, 28 May 2011

Setting up an Adhoc wifi hotspot for your iPad using Ubuntu Linux


Well, since moving into my flat in Berlin, I have been stuck without wifi, which has rendered my iPad a little less useful than it was before. The flats just supply you with an RJ45 socket in the wall and an Ethernet cable.

So knowing how flexible Ubuntu Linux is, I thought I would have a look around and see if there was a way to set it up. There were lots of very good articles, a blog posts on the topic, and the truth is with Linux it couldn't be easier.

You basically just have to click on you network connection icon in the Gnome panel, and select "Create new wireless network" , give it a name and select the security type.


The only thing I have read, and found with my wifi network adapter is that they don't always support all forms of security, so you will need to test.

I started with no security, then WEP 40bit, then WEP 128bit and finally WPA. Your mileage may vary, so test them all.

It works perfectly, and I was able to download my newspapers , books, films etc etc.

Thursday, 11 November 2010

Speeding up your Linux browser using a ramdisk


I came across an interesting article yesterday, about someone who had speeded up their browser on Windows by using a ramdisk, and knowing that Linux can happily do this, I decided to write down how to do this for the Linux user.

Firstly we need to create a directory that we can use for the ramdisk, and get it to automatically mount everytime we start our machine.

1) create the directoty - sudo mkdir /var/ramdisk
2) then edit this file and add the following line at the end - gksudo gedit /etc/fstab
/var/ramdisk /var/ramdisk tmpfs size=512m 0 0
3) Now mount this new ramdisk to test
sudo mount /var/ramdisk

We now have our ramdisk, and we can add this to the start options for Chromium and Firefox.

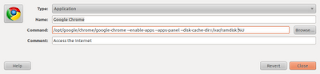
Firstly we will do Chrome as it's the easiest, simple add the following line to the startup options/icon that your use to start Chrome.

--disk-cache-dir=/var/ramdisk

See below:


If you now click on Chrome, you will now be using a Ram disk, and you can look at what you are storing in that cache, but looking in the directory you created earlier.

Now, for firefox we use a different method,

Mozilla Firefox

  • Type about:config into the address bar, accept the warning ("I'll be careful, I promise!")
  • Right click > New > String
  • Type browser.cache.disk.parent_directory into the box and press OK
  • Type the path of your BrowserCache directory -- /var/ramdisk press OK
  • Close all open Firefox tabs and windows
  • Open the browser again
(Part of the above section was lifted directly from this web page to save typing - http://goo.gl/RKr7z)

That's it, you now have you cache being stored in RAM instead of on disk, which is significantly faster, for saving and reading cached pages. I have started with a RAM disk of 512m, which may be too large for you or too small, but you can adjust that once you see what your usage profile is like.

Wednesday, 10 November 2010

Is upgrading to the Intel i5 laptop processor worth the effort


In a word, yes . As you may have read on this blog a few weeks ago , I tried an experiment with using an SSD harddisk for the operating system in conjunction with an external 500GB hybrid disk for all the more volatile parts of the OS, like /var and /tmp.

This was a resounding successful with a marked ramp in performance across the whole operating system and applications, to the point now , that all other machines seem like sloth's in comparison.

I had a need to upgrade my work laptop recently, specifically for more CPU cores and access to that lastest hardware virtualization extensions. I use the laptop extensively for virtualization, so I picked the Dell Latitude E6410. This is a really good work horse, but more importantly it comes with the Intel i5 processor.

This has had a very positive affect on the whole systems performance when running virtual guests with VirtualBox - my current virtualization platform of choice - to the extent that I can now over commit on memory and cpu's , plus the density I can achieve on this box has literally doubled.

I always keep a system monitor going to see how hard the system us working, and while on the old E6400, with two virtual machines running , the system would be noticeable slower, now with four virtual guests running, there is still plenty of head room for the other applications I need to run.

If are about to upgrade, and you need the ability to run multiple virtual guests, then I would definitely recommend the extra spend on this processor. The more memory the better, but I'm happily working with 4GB currently, but I can take this up to 8GB if the need should arise.

Well done Dell this is a grand machine for running Linux.

Tuesday, 12 October 2010

Ubuntu 10.10 is released and raises the bar for the Linux desktop again


Well, we have been testing it for five months, and playing with all the new features and functions that the latest software from the open source community can give us. So, if you want to be pleased with just how easy this release is to install or upgrade, then give it a try.

You can read the full release notes at the Ubuntu web site for more detailed information on exactly what each version of this Linux distribution is going to deliver, but it has impressed me on every server, desktop and virtual image I have installed it onto or into, and this post is coming from my just up dated work laptop.

Ubuntu is not every Linux users friend, and I understand some of the resistance, but most open minded open source people can see a definite role for this in the whole open source universe. I use a great deal of Linux, in many different forms, but if you want a desktop that just works, then certainly look no further.

If you are currently using Ubuntu 10.04 LTS, you will need to modify your software sources to allow updates from newer releases, and not just LTS releases. Once you have done that, you will be offered the choice of this new version. This will ask a few simple questions, download about 1,000 files, and prompt you during the process for a few answers. That's it , you are now on the latest version.

An amusing thing about the date of release, is that it was 101010, which in decimal is 42. Douglas Adams has already informed us that this is the meaning of life, the universe and everything, so you can't get much higher praise than that. We can now use this release of Ubuntu to figure out what the question was ;-)

Anyway, go and grab a copy and give it whirl , you won't be disappointed.

Saturday, 2 October 2010

Using SSD and hybrid disks to speed up your computer


I have been reading for a while about the advantages of using SSD disks for starting/booting your computer, which can be especially useful on a laptop, which you are far more likely to restart. Well I decided to put this into action and see what speed improvements these changes would make, and how it would improve the speed in several tests.

The hardware:
Dell Inspiron 6400 Laptop with 4GB Ram and an Intel Core 2 duo P8700 2.5 Ghz
OS Ubuntu 10.04.1 LTS fully patched
Primary new disk drive Kingston SSDnow V+ 64 GB
Secondary disk Seagate Momentus XL hybrid drive 500 GB / 4GB SSD

After considerable thought, and reading that the SSD disk would be good for 1 million reads, I decided that I would use two disk's instead of one, and all variable data would go on the hybrid drive. This would be true for any OS, basically if the partition is going to be written to on a regular basis , then move it onto an external disk. Luckily the Dell comes with a built in eSata connector, which offers really good performance for an external unit, and I wouldn't recommend using USB 2 or firewire unless thats all you have.

I therefore moved the following disk partitions onto the Seagte hybrid drive - /tmp, /var, /home - and made sure that their UUID's were correctly configured on the internal Kingston SSD disk in /etc/fstab. The hybrid Seagate drive is housed in an Icy Box external eSata 2.5" enclosure which works really well.

So to the tests, with the original 2.5" Seagate Momentus 7200 250GB internal disk. I used my stop watch, and with the SSD fitted I suspect some of timings are do my lack of ability to react that quickly.

1) From the end of the BIOS post to a login prompt averaged - 30 seconds
2) Loading firefox 3.6.8 with 25 tabs open - 18 seconds
3) loading Google Chrome with 25 tabs - 10 seconds

with the new configuration

1) From the end of the BIOS post to a login prompt averaged - 5 seconds
2) Loading firefox 3.6.8 with 25 tabs open - 4 seconds
3) loading Google Chrome with 25 tabs - 2 seconds

It is obvious that the new system is significantly faster than it was previously, so the claims being made by the SSD manufacturers are true, your system will be quicker. I would also comment, that everything now works at a much smarter rate, and I have no doubts if I had tested more applications the same performance boost would have been measured.

This was not a cheap experiment however, and the two drives cost me in excess of £250. I was looking for a speed boost with my virtualization requirements, and that is what I have achieved, but unless you have a real need for this performance improvement , then you may well find your money better spent of other needs. I would also now like to try this with the latest Intel processors to see if I can squeeze even more performance out of the laptop.