
 I came across this problem while setting up Docker on my OSX environment , and after searching the web , I found a method that works well, and cures the problem.
Basically once the Virtualbox VM is created you need to edit the network adapter drivers and set them to "PCNET-FAST III" instead of the paravirtualised drivers. You need to do both adapters, and then restart boot2docker.
You will notice that you get the correct settings now in your /etc/resolv.conf file.
This was annoying me, and meant I had to reset the settings in the above file everytime I start docker - which is not ideal.
Hope this saves you some time.
I came across this problem while setting up Docker on my OSX environment , and after searching the web , I found a method that works well, and cures the problem.
Basically once the Virtualbox VM is created you need to edit the network adapter drivers and set them to "PCNET-FAST III" instead of the paravirtualised drivers. You need to do both adapters, and then restart boot2docker.
You will notice that you get the correct settings now in your /etc/resolv.conf file.
This was annoying me, and meant I had to reset the settings in the above file everytime I start docker - which is not ideal.
Hope this saves you some time.
Showing posts with label Ubuntu. Show all posts
Showing posts with label Ubuntu. Show all posts
Thursday, 11 June 2015
VM created by boot2docker init does not have DNS set up correctly - heres how to fix it
I came across this problem while setting up Docker on my OSX environment , and after searching the web , I found a method that works well, and cures the problem.
Basically once the Virtualbox VM is created you need to edit the network adapter drivers and set them to "PCNET-FAST III" instead of the paravirtualised drivers. You need to do both adapters, and then restart boot2docker.
You will notice that you get the correct settings now in your /etc/resolv.conf file.
This was annoying me, and meant I had to reset the settings in the above file everytime I start docker - which is not ideal.
Hope this saves you some time.


Sunday, 31 August 2014
Using Docker to run rtorrent to reduce your servers resource requirements

Let me state early and clearly , any one who thinks Docker is a new technology, knows nothing about IT and even less about virtualisation. So if some smartalec in your office starts spouting about this new technology, take them down a peg or two with a few links to Solaris containers, OpenVZ or LXC.
What the Docker team have done extremely well, is make these ancient technologies very accessible and very easy to use, with a well defined tool set and API. This they must be highly praised for.
In the words of Einstein however, they work on the shoulders of giants, who did a lot of the heavy lifting, and let us all not forget this.
I have been using containers for years, and we worked on a very successful cloud at Nokia using OpenVZ, where we built our own tools.
So I thought I would give Docker a spin on one of my cloud servers and just kick the tyres to start. I picked an application I use a lot for downloading Linux ISO's so it seemed a good choice. It was very straight forward indeed.
The host operating system was CentOS 6.5 - which I'm growing less fond of as each week passes, as in the fast moving cloud space, Ubuntu is simply better. It was installed however, and I couldn't be bothered to change it. You need to enable the EPEL repository and install docker with yum.
I decided to download and use the userland tools of a Docker Ubuntu image - but whatever image you choose - the host kernel is the one that will be used. This is to do with the historically well thought out ABI built into the Linux kernel that allows this all to work.

Once the image was retrieved from the Docker registry - I fired up a container with Ubuntu 14.04 tools and installed screen, rtorrent , vim and htop.
I always run rtorrent with screen so I can just leave it running and come back to it when required. Also importantly - when starting your container use /bin/bash so you can have an interactive session with it to be able to go back and check your screen/rtorrent session. A command like the following will do.
docker run -i -t my-ubuntu-image /bin/bash
Be care however when you want to exit this container , DON'T type exit but CTRL-p, CTRL-q , so everything keeps running and you can reattach to the container when you wish to check on progress.
This uses significantly less resources than spinning up a KVM virtual image to do the same job, as it uses the resources of the host system that are already running.
I have deliberately not put all the commands need to do this here , as the Docker documentation is good and very clear, so duplication is pointless
Sunday, 3 July 2011
DNSMASQ config on Ubuntu desktop for fast DNS lookups

Here is a quick rundown on how to use dnsmasq as a fast DNS cache. I was driven to set this up, as the DNS servers that my flat company supply are like treacle on a very cold day.
Help on installing DNSMASQ
Install the daemon, and then edit /etc/dnsmasq.conf to listen on port 127.0.0.1. You need to find the line that has #listen-address= and remove the hash and add the address.
Add this nameserver 127.0.0.1 into the top of /etc/resolv.conf file at the top, and restart the daemon. This is where Linux looks for it's DNS servers.
/etc/init.d/dnsmasq restart
Do a DNS lookup like this to test - dig google.com
Look at the time returned, and then do it again, and look at the time difference, a lot faster isn't it.
Advanced fun and games.
If you want to look at the contents of the cache that dnsmasq is curently storing (in memory)then you need add the -q parameter to the startup scipt, just tag it onto the end. The start-up script is in the /etc/init.d directory, and you need to scroll down to the start function. You will see a long list of parameters that get passed, just add the -q to the end.
Then restart the daemon.
To look at the cache we need to send the SIGUSR1 parameter to the kill command to dump the currently held cache into the /var/log/syslog file. Use the following command to do that.
kill -s USR1 1234 - for instance where 1234 is the PID number of the dnsmasq running daemon. You can find that with the ps -ef | grep dnsmasq command.
If you want to add static DNS entries into your cache, edit the /etc/hosts file and add your required , and often used DNS entries in there. These will be read when dnsmasq starts , and will be available immediately without reference to an upstream DNS resolver. So they will be extrememly quick, which is just what I wanted.
For a quick guide on DNS look here.
Quick guide to DNS
Thursday, 30 June 2011
Using rtorrent on a remote Centos server for 24/7 downloads

As I'm sure you all know a lot of information is passed around the Web using bittorrent. Most of the clients have a nice GUI front end that allow you to easily grab the torrent files and start downloading.
What if you don't have a GUI on the machine you wish to use, or what if this is to be a 24/7 service for you. Well Linux as always has solutions, and one of those is a program called rtorrent. If you only like flashy interfaces this is not for you, but it works perfectly, and is very reliable.
I use a Centos 5.6 virtual server in the cloud for all sorts of uses, like a socks proxy and an SSL endpoint, and this is where I wanted to run the client. This machine is not very powerful, so you don't need to worry on that score. There are many Linux virtual machines you can obtain these days, for not a great deal of money.
Firstly, you need to visit this web site and download three RPM's.
Site for RPMS
libsigc++20-2.0.17-1.el5.rf.x86_64.rpm
libtorrent-0.12.6-1.el5.rf.x86_64.rpm
rtorrent-0.8.6-2.el5.rf.x86_64.rpm
Now, depending on how you configured your machine, there may be other dependencies, so check when you install these as follows
rpm -ivh *.rpm
Once this is done, I would then also make sure that the "screen" application is installed, as this will allow you to start rtorrent on the remote server, and re-connect to it when you desire. Spend a few moments looking at "screen" commands on the web to understand how it fits together - like here.
Using Screen
So now, I run screen and then I run rtorrent.
Once rtorrent is loaded, read this web page for an excellent quick guide to using the application:
How to use rtorrent as pro
Once you have your torrent running, you can detach from your screen session, with the CTRL-A d command. You can now logout of remote server, and all is still running.
To re-connect, you just login to the remote server again, and then run screen -r, and you will be back looking at rtorrent happily running.
This is very useful for downloading Linux ISO distribution files etc.
Tuesday, 15 March 2011
Changing the network settings with VMware player 3.1 on Linux

I came across an issue today, where I wanted to remove one of the virtual network interfaces that gets installed when you install VMware player. This turned out to be relatively straight forward, once you know where to look.
In VMware workstation , you get a great graphical tool to amend and alter the virtual network configuration, but not so with the free VMplayer.
The reason I wanted to do this was remove the virtual interface vmnet8, as I'm not using any NAT's interfaces, so this is not needed and will only consume resources.
Firstly point your favourite editor at /etc/vmware/networking as a root user and then modify the file like so.
7 answer VNET_8_DHCP no
8 answer VNET_8_DHCP_CFG_HASH B9130F0FB783D3AC081BDA79708F4635E63130A4
9 answer VNET_8_HOSTONLY_NETMASK 255.255.255.0
10 answer VNET_8_HOSTONLY_SUBNET 172.16.73.0
11 answer VNET_8_NAT no
12 answer VNET_8_VIRTUAL_ADAPTER no
The key , is that you have turned all the VNET_8 answers to no instead of yes.
Once this is safely saved, run the following commands to re-start the networking.
sudo vmware-networks --stop ; sudo vmware-networks --start
Once you have done this, if you now issue an /sbin/ifconfig you will notice that vmnet8 does now not appear.
Thursday, 11 November 2010
Speeding up your Linux browser using a ramdisk

I came across an interesting article yesterday, about someone who had speeded up their browser on Windows by using a ramdisk, and knowing that Linux can happily do this, I decided to write down how to do this for the Linux user.
Firstly we need to create a directory that we can use for the ramdisk, and get it to automatically mount everytime we start our machine.
1) create the directoty - sudo mkdir /var/ramdisk
2) then edit this file and add the following line at the end - gksudo gedit /etc/fstab
/var/ramdisk /var/ramdisk tmpfs size=512m 0 0
3) Now mount this new ramdisk to test
sudo mount /var/ramdisk
We now have our ramdisk, and we can add this to the start options for Chromium and Firefox.
Firstly we will do Chrome as it's the easiest, simple add the following line to the startup options/icon that your use to start Chrome.
--disk-cache-dir=/var/ramdisk
See below:
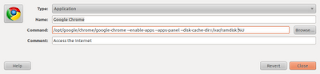
If you now click on Chrome, you will now be using a Ram disk, and you can look at what you are storing in that cache, but looking in the directory you created earlier.
Now, for firefox we use a different method,
Mozilla Firefox
- Type about:config into the address bar, accept the warning ("I'll be careful, I promise!")
- Right click > New > String
- Type browser.cache.disk.parent_directory into the box and press OK
- Type the path of your BrowserCache directory -- /var/ramdisk press OK
- Close all open Firefox tabs and windows
- Open the browser again
(Part of the above section was lifted directly from this web page to save typing - http://goo.gl/RKr7z)
That's it, you now have you cache being stored in RAM instead of on disk, which is significantly faster, for saving and reading cached pages. I have started with a RAM disk of 512m, which may be too large for you or too small, but you can adjust that once you see what your usage profile is like.
Wednesday, 10 November 2010
Is upgrading to the Intel i5 laptop processor worth the effort

In a word, yes . As you may have read on this blog a few weeks ago , I tried an experiment with using an SSD harddisk for the operating system in conjunction with an external 500GB hybrid disk for all the more volatile parts of the OS, like /var and /tmp.
This was a resounding successful with a marked ramp in performance across the whole operating system and applications, to the point now , that all other machines seem like sloth's in comparison.
I had a need to upgrade my work laptop recently, specifically for more CPU cores and access to that lastest hardware virtualization extensions. I use the laptop extensively for virtualization, so I picked the Dell Latitude E6410. This is a really good work horse, but more importantly it comes with the Intel i5 processor.
This has had a very positive affect on the whole systems performance when running virtual guests with VirtualBox - my current virtualization platform of choice - to the extent that I can now over commit on memory and cpu's , plus the density I can achieve on this box has literally doubled.
I always keep a system monitor going to see how hard the system us working, and while on the old E6400, with two virtual machines running , the system would be noticeable slower, now with four virtual guests running, there is still plenty of head room for the other applications I need to run.
If are about to upgrade, and you need the ability to run multiple virtual guests, then I would definitely recommend the extra spend on this processor. The more memory the better, but I'm happily working with 4GB currently, but I can take this up to 8GB if the need should arise.
Well done Dell this is a grand machine for running Linux.
Tuesday, 12 October 2010
Ubuntu 10.10 is released and raises the bar for the Linux desktop again

Well, we have been testing it for five months, and playing with all the new features and functions that the latest software from the open source community can give us. So, if you want to be pleased with just how easy this release is to install or upgrade, then give it a try.
You can read the full release notes at the Ubuntu web site for more detailed information on exactly what each version of this Linux distribution is going to deliver, but it has impressed me on every server, desktop and virtual image I have installed it onto or into, and this post is coming from my just up dated work laptop.
Ubuntu is not every Linux users friend, and I understand some of the resistance, but most open minded open source people can see a definite role for this in the whole open source universe. I use a great deal of Linux, in many different forms, but if you want a desktop that just works, then certainly look no further.
If you are currently using Ubuntu 10.04 LTS, you will need to modify your software sources to allow updates from newer releases, and not just LTS releases. Once you have done that, you will be offered the choice of this new version. This will ask a few simple questions, download about 1,000 files, and prompt you during the process for a few answers. That's it , you are now on the latest version.
An amusing thing about the date of release, is that it was 101010, which in decimal is 42. Douglas Adams has already informed us that this is the meaning of life, the universe and everything, so you can't get much higher praise than that. We can now use this release of Ubuntu to figure out what the question was ;-)
Anyway, go and grab a copy and give it whirl , you won't be disappointed.
Saturday, 2 October 2010
Using SSD and hybrid disks to speed up your computer

I have been reading for a while about the advantages of using SSD disks for starting/booting your computer, which can be especially useful on a laptop, which you are far more likely to restart. Well I decided to put this into action and see what speed improvements these changes would make, and how it would improve the speed in several tests.
The hardware:
Dell Inspiron 6400 Laptop with 4GB Ram and an Intel Core 2 duo P8700 2.5 Ghz
OS Ubuntu 10.04.1 LTS fully patched
Primary new disk drive Kingston SSDnow V+ 64 GB
Secondary disk Seagate Momentus XL hybrid drive 500 GB / 4GB SSD
After considerable thought, and reading that the SSD disk would be good for 1 million reads, I decided that I would use two disk's instead of one, and all variable data would go on the hybrid drive. This would be true for any OS, basically if the partition is going to be written to on a regular basis , then move it onto an external disk. Luckily the Dell comes with a built in eSata connector, which offers really good performance for an external unit, and I wouldn't recommend using USB 2 or firewire unless thats all you have.
I therefore moved the following disk partitions onto the Seagte hybrid drive - /tmp, /var, /home - and made sure that their UUID's were correctly configured on the internal Kingston SSD disk in /etc/fstab. The hybrid Seagate drive is housed in an Icy Box external eSata 2.5" enclosure which works really well.
So to the tests, with the original 2.5" Seagate Momentus 7200 250GB internal disk. I used my stop watch, and with the SSD fitted I suspect some of timings are do my lack of ability to react that quickly.
1) From the end of the BIOS post to a login prompt averaged - 30 seconds
2) Loading firefox 3.6.8 with 25 tabs open - 18 seconds
3) loading Google Chrome with 25 tabs - 10 seconds
with the new configuration
1) From the end of the BIOS post to a login prompt averaged - 5 seconds
2) Loading firefox 3.6.8 with 25 tabs open - 4 seconds
3) loading Google Chrome with 25 tabs - 2 seconds
It is obvious that the new system is significantly faster than it was previously, so the claims being made by the SSD manufacturers are true, your system will be quicker. I would also comment, that everything now works at a much smarter rate, and I have no doubts if I had tested more applications the same performance boost would have been measured.
This was not a cheap experiment however, and the two drives cost me in excess of £250. I was looking for a speed boost with my virtualization requirements, and that is what I have achieved, but unless you have a real need for this performance improvement , then you may well find your money better spent of other needs. I would also now like to try this with the latest Intel processors to see if I can squeeze even more performance out of the laptop.
Tuesday, 7 September 2010
Make using the Command line more fun in Ubuntu
Ubuntu has spawned several really great Linux distributions, and one of the best is Linux Mint. It has always had a feature where-by when you open a command prompt, it displays a simple - often silly - message to brighten up your day before you get stuck in. To be fair this has been around for a long time in the Unix world, but is still funny.Ubuntu doesn't have this turned on by default, so I decided to enable it , and it really isn't that hard, if we borrow a great command from Mint guys.
First you need to install the fortune cookie applications and message files:
sudo apt-get install fortune-mod cowsay
You can test this has installed ok by typing the following:
fortune
and you should get a message displayed.
Next you need to create shell scipt that will do all the hard work for you - borrowed from the Mint guys
sudo vim /usr/bin/ubuntu-fortune
Here is what to put into the file
Now we need to make this file executable by doing this

First you need to install the fortune cookie applications and message files:
sudo apt-get install fortune-mod cowsay
You can test this has installed ok by typing the following:
fortune
and you should get a message displayed.
Next you need to create shell scipt that will do all the hard work for you - borrowed from the Mint guys
sudo vim /usr/bin/ubuntu-fortune
Here is what to put into the file
#!/bin/bash
RANGE=4
number=$RANDOM
let "number %= $RANGE"
case $number in
0)
cow="small"
;;
1)
cow="tux"
;;
2)
cow="koala"
;;
3)
cow="moose"
;;
esac
RANGE=2
number=$RANDOM
let "number %= $RANGE"
case $number in
0)
command="/usr/games/cowsay"
;;
1)
command="/usr/games/cowthink"
;;
esac
/usr/games/fortune | $command -f $cow
Now we need to make this file executable by doing this
sudo chmod +x /usr/bin/ubuntu-fortune
Then last but not least we need to place it into one of the shell script master files so that it gets called every time when you start up a shell script. So edit the following file, and place the command - /usr/bin/ubuntu-fortune - as the last entry in the file.
sudo vim /etc/bash.bashrc
Voila, when you now start a shell terminal , you will have something to laugh at, and you can of course just type the command we created above to get a laugh on got.
Here is an example:

Now there are lots of other fortunes you can install, some of them can be very rude, so be careful, and you can grab these either using apt-get or using the Synaptic package manager.
Have fun.
Thursday, 22 July 2010
Problem adding the new Spotify Linux client repository security key
The great news is that there is now a native version of spotify, which works really well on Ubuntu, and I'm listening to it now as I type.
While I was installing it though, I found the link - below - to install the security key for the repository was broken - timed out.
gpg --keyserver wwwkeys.de.pgp.net --recv-keys 4E9CFF4E
So I found the key manually, and I'm posting it here so you can manually install it. How?
1) Copy all the text in the key below and paste it into a text file, using your favourite editor
2) Open the software sources application and click on the Authentication Tab - see below
 Import your key
3) click on the Import Key file
4) Select the file you created earlier
5) Done ;-)
Here is the key and the spotify web page that gives the other instructions
-----BEGIN PGP PUBLIC KEY BLOCK-----
Version: SKS 1.0.10
mQGiBEwiQL0RBACyA2K0RUDZWQl7Bf7lxib870Jic/BvLCkwhil+SY+GRsZ2kEeSoSzkh+Oz
mzgKUBqQh4A4n4hq1sFNkHY6NfOCpJ9j+sewAWvQ/lDC/XiOkKXGg2y6J8V7wCPqORchPMDP
zuF8AdhS1y8BIH9Vc8vQu3lJnhB9smT/t2fjII8cmwCg04P/lRF2BzAwxvzsqw3SH844dAEE
AKngWb8MM2orgZ0ImN2PiwX7CsoTdFitVEhPFshk1vxH8ZnYwYGmCPQy5ierLi7SFcXOA26+
skaFkpQApwqeArYSRJcnJ/CkgBn0LXFd8diNKy0wnebDeaH/eD/O3bqU9Z2K7UXf/OR/kdIz
uA9DYyETKrIPDp3kFeBxB5AfkJOoA/9kULFrh9gmkU5f2nzly9FetZ6fDnPYz3qEbK2LZm2K
czGhJJ3GDcoqhocHywecgSfr17/35pmGpJCwRzbZyxgKc1XZMP5CII/uBDoouBocWplJqKcv
tAbSC66hss2+KrsouODOo3yh8HU54xRDx8ZBr4SCVYJ40solMuAZul+yBbQ+U3BvdGlmeSBQ
dWJsaWMgUmVwb3NpdG9yeSBTaWduaW5nIEtleSA8b3BlcmF0aW9uc0BzcG90aWZ5LmNvbT6I
ZgQTEQIAJgUCTCJAvQIbAwUJA8JnAAYLCQgHAwIEFQIIAwQWAgMBAh4BAheAAAoJEE+ZRjVO
nP9OuxMAoJPoPRAATOzyhIyeK3kEaSVtdzKQAKCqZ0io8BUfXeNlDNw9aVgKJJJ7XYhGBBAR
AgAGBQJMNd/jAAoJEPIPrAt7g1fl9tYAoLowChxtbgjY/576t9YpZ3q1871TAKCnisBmpNtc
y8gQwwYvSWAMWJQIOrkCDQRMIkC9EAgAjIbDeTHbKujlNt9Hdx0p6X2mnYdp2CmIjq4RuVhX
KNRsW1EGa+Q3dy5q4EDH/HwMQvbOe6K8e0zXOfxEzuDzSK/No6YDLQtIitEoyMKzc7ZqZ5aV
NRRjGkneMRHzK2vPEXI/MdaffDpXxGD7mcfc9AFtmred8c+C59W5cGbjSS/OtwSEpICPgwIz
VsnsoeCfKXOqh0NkIUltFOPD8O8b7zaWxzpPiMbXxTtZzucm4p+fRsYeVqIjtMsKPtDwLGqb
BVH50UroH5A4CtudElnzMnoTjzRWctK8YakC9KIIUbt0INWdECZ1Ww7XtJiZuqzCxLEx64l+
VSoXnqbY3vdI5wADBQf+LnhShmHAZqyvksZs6JXRAnul2cnEP8eekXPQO6U07e6hwhJIVt5H
EKG/iPSJBc6IIqTVoSoSQmzz0BKAi63sa/UQeEtPKh3nkjj6O6zl+vPkBV/YY/xB8ubMmPkb
W4xSMZxPkyBFEow9KzWfIoymKxnAToHI73Xw9BMWjCw9pdmevLreNwD6446rkOsnU4LdIXX9
lA44Fk3SQu4p70GsyXQB+eI6gRnUBkGTFeyCu2yjHNwiPvYItf5j16L5mc79ifZkaKGhCQy/
6uD/WVdjAb3YXZUI4gvXx9GSrBK0cEI/KepuNCbEqOAkEZOhApk0p5npiOId1XvXcPKz5z1U
mohPBBgRAgAPBQJMIkC9AhsMBQkDwmcAAAoJEE+ZRjVOnP9OTa4AniK1eavqdD/SSkZ+N8SI
+/oJMhXQAJ9HgrzbezFA6W355iHvyuCZP19+fA==
=D9pj
-----END PGP PUBLIC KEY BLOCK-----
Spotify client for Linux
While I was installing it though, I found the link - below - to install the security key for the repository was broken - timed out.
gpg --keyserver wwwkeys.de.pgp.net --recv-keys 4E9CFF4E
So I found the key manually, and I'm posting it here so you can manually install it. How?
1) Copy all the text in the key below and paste it into a text file, using your favourite editor
2) Open the software sources application and click on the Authentication Tab - see below
 Import your key
3) click on the Import Key file
4) Select the file you created earlier
5) Done ;-)
Here is the key and the spotify web page that gives the other instructions
-----BEGIN PGP PUBLIC KEY BLOCK-----
Version: SKS 1.0.10
mQGiBEwiQL0RBACyA2K0RUDZWQl7Bf7lxib870Jic/BvLCkwhil+SY+GRsZ2kEeSoSzkh+Oz
mzgKUBqQh4A4n4hq1sFNkHY6NfOCpJ9j+sewAWvQ/lDC/XiOkKXGg2y6J8V7wCPqORchPMDP
zuF8AdhS1y8BIH9Vc8vQu3lJnhB9smT/t2fjII8cmwCg04P/lRF2BzAwxvzsqw3SH844dAEE
AKngWb8MM2orgZ0ImN2PiwX7CsoTdFitVEhPFshk1vxH8ZnYwYGmCPQy5ierLi7SFcXOA26+
skaFkpQApwqeArYSRJcnJ/CkgBn0LXFd8diNKy0wnebDeaH/eD/O3bqU9Z2K7UXf/OR/kdIz
uA9DYyETKrIPDp3kFeBxB5AfkJOoA/9kULFrh9gmkU5f2nzly9FetZ6fDnPYz3qEbK2LZm2K
czGhJJ3GDcoqhocHywecgSfr17/35pmGpJCwRzbZyxgKc1XZMP5CII/uBDoouBocWplJqKcv
tAbSC66hss2+KrsouODOo3yh8HU54xRDx8ZBr4SCVYJ40solMuAZul+yBbQ+U3BvdGlmeSBQ
dWJsaWMgUmVwb3NpdG9yeSBTaWduaW5nIEtleSA8b3BlcmF0aW9uc0BzcG90aWZ5LmNvbT6I
ZgQTEQIAJgUCTCJAvQIbAwUJA8JnAAYLCQgHAwIEFQIIAwQWAgMBAh4BAheAAAoJEE+ZRjVO
nP9OuxMAoJPoPRAATOzyhIyeK3kEaSVtdzKQAKCqZ0io8BUfXeNlDNw9aVgKJJJ7XYhGBBAR
AgAGBQJMNd/jAAoJEPIPrAt7g1fl9tYAoLowChxtbgjY/576t9YpZ3q1871TAKCnisBmpNtc
y8gQwwYvSWAMWJQIOrkCDQRMIkC9EAgAjIbDeTHbKujlNt9Hdx0p6X2mnYdp2CmIjq4RuVhX
KNRsW1EGa+Q3dy5q4EDH/HwMQvbOe6K8e0zXOfxEzuDzSK/No6YDLQtIitEoyMKzc7ZqZ5aV
NRRjGkneMRHzK2vPEXI/MdaffDpXxGD7mcfc9AFtmred8c+C59W5cGbjSS/OtwSEpICPgwIz
VsnsoeCfKXOqh0NkIUltFOPD8O8b7zaWxzpPiMbXxTtZzucm4p+fRsYeVqIjtMsKPtDwLGqb
BVH50UroH5A4CtudElnzMnoTjzRWctK8YakC9KIIUbt0INWdECZ1Ww7XtJiZuqzCxLEx64l+
VSoXnqbY3vdI5wADBQf+LnhShmHAZqyvksZs6JXRAnul2cnEP8eekXPQO6U07e6hwhJIVt5H
EKG/iPSJBc6IIqTVoSoSQmzz0BKAi63sa/UQeEtPKh3nkjj6O6zl+vPkBV/YY/xB8ubMmPkb
W4xSMZxPkyBFEow9KzWfIoymKxnAToHI73Xw9BMWjCw9pdmevLreNwD6446rkOsnU4LdIXX9
lA44Fk3SQu4p70GsyXQB+eI6gRnUBkGTFeyCu2yjHNwiPvYItf5j16L5mc79ifZkaKGhCQy/
6uD/WVdjAb3YXZUI4gvXx9GSrBK0cEI/KepuNCbEqOAkEZOhApk0p5npiOId1XvXcPKz5z1U
mohPBBgRAgAPBQJMIkC9AhsMBQkDwmcAAAoJEE+ZRjVOnP9OTa4AniK1eavqdD/SSkZ+N8SI
+/oJMhXQAJ9HgrzbezFA6W355iHvyuCZP19+fA==
=D9pj
-----END PGP PUBLIC KEY BLOCK-----
Spotify client for Linux
Sunday, 18 July 2010
Using and looking at Btrfs in the latest Ubuntu Maverick build

I love looking at new technologies and assessing what they might be able to offer not only me, but the people that I do consultancy for. There is nothing like being able to pluck a technology white rabbit out of the hat in front the of the decision makers.
Well, for several years the modern file system designed by Sun called ZFS, has been rightly getting plaudits for not only it's usability but the built in functionality that companies have been paying large sums of money to Symantic to have the same features.
Ironically, an open source project was started within Oracle to come up with a system for Linux that would offer the same features - the company that now owns Sun and ZFS.
Well the developers in the Linux community have been busy with this next generation file system, and it is now available in the latest Ubuntu 10.10 Alpha 2 builds, and I have just installed it using the alternative iso file into a Virtualbox test machine. I will be doing this on real hardware as well next week.
The installation was easy enough using the ncurses method as opposed to the more modern GUI mode, and the virtual machine started without any issues. At the moment you have to keep the /boot partition on ext4, as btrfs doesn't work with that as yet, but it is being worked on.
One of the features I'm looking for along side the advanced features of easy command line snapshots and duplication is a speed boost, only time will reveal if this is to be realised.
Using the command btrfs from the command line you can take snapshots of subvolumes and resize the filesystem on the fly, which offers so much simplification over the tools and methods we current use, like LVM etc.
I'm looking forward to spending some more time investigating all of the features of this very interesting new filesystem.
Saturday, 17 July 2010
Setting Chromium to use the search engine of your choice
Chromium, like all good browsers is very flexible and allows you change things around, which is good, as one of it's default features can be very annoying. The feature , is that it auto detects which country you are in , and when you do a search it returns the information in the language of that country. This is great if you want that, but can be a real pain in the backside if you don't. As I travel between France and the UK very regularly, I need to be able to have the search engine, where ever I am, and this little trick sorts that out for you.
Well there is a easy way to fix that.
1) Go to the wrend menu and select options
2) Then click on manage search engines
3) Click on add to create a new one
4) Make it look like the picture below - substitue your country as appropriate.
5) Make it one of the defaults
6) Now test it with a search in the omnibar for something
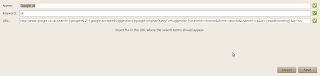
The other great part of this is you can also set up other custom search engines for all your favourite sites , and I have set one up for the Linux Man pages , which I found on another site.
So if I now want to look up the man page for a command, I just type man command in the omnibox, and it takes me straight there.
See this picture on how I did that one.
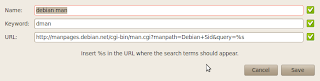
Well there is a easy way to fix that.
1) Go to the wrend menu and select options
2) Then click on manage search engines
3) Click on add to create a new one
4) Make it look like the picture below - substitue your country as appropriate.
5) Make it one of the defaults
6) Now test it with a search in the omnibar for something

The other great part of this is you can also set up other custom search engines for all your favourite sites , and I have set one up for the Linux Man pages , which I found on another site.
So if I now want to look up the man page for a command, I just type man command in the omnibox, and it takes me straight there.
See this picture on how I did that one.

Thursday, 3 June 2010
Google chrome stable is released for Linux and Mac

Well, I have been working with the beta version of chrome and the developer version of chromium since they were released and have seen them grow into great browsers that deserve their place amongst the best on the web.
So it was a momentous day when we got a full release version on the Linux - and Mac - platforms that will now be compared to other stable versions available for these platforms , like Firefox and Safari.
There are no particular new features in this release, as the last beta had most of the news, but this is just to give a base line from which to build.
They have mentioned that when Adobe launch their flash player in a few weeks - version 10.1 - then this will be built into the browser, which is great for us , but could be a major problem for Apple and Microsoft.
You’ll be able to synchronize not only bookmarks across multiple computers, but also browser preferences -- including themes, homepage and startup settings, web content settings, preferred languages, and even page zoom settings. Meanwhile, for avid extensions users, you can enable each extension to work in incognito mode through the extensions manager.
The stable release also incorporates HTML5 features such as Geolocation APIs, App Cache, web sockets, and file drag-and-drop. For a taste of HTML5’s powerful features, try browsing through websites developed in HTML5 such as scribd.com, dragging and dropping attachments in Gmail, or by enabling the geolocation functionality in Google Maps. We’ve also given Chrome’s bookmark manager a facelift with HTML5.
I have been testing this Browser on my Ubuntu 10.04 laptops in both 32 and 64 bit versions and found it to be fast, stable and reliable. I do use Chromium on a day to day basis as I like to help debug the future of the browser, but will turn to Chrome for it's stability when I need to book flights or do my on-line banking.
I can recommend you give it a go and just see the speed difference you will experience.
Download it here Get Google Chrome Stable
Wednesday, 17 February 2010
Chrome shoots to number 2 in my blog viewing figures.
 My Blogs visitor browser stats
 Now, we must get the caveats out of the way first:
1) I know my blog is Linux/open source oriented
2) This is a very small sample set and number of users
3) I'm sure absolutely positive that other sites could have their views slued depending on the subject matter.
However, I have been using Google Analytics to keep an eye on my blog since I started it, and without fail the order of browsers visiting my site has always been Firefox first and Microsoft Internet explorer second, but not anymore. Google Chrome has moved into second place by some margin as you can see above.
In the grand scheme of the computing universe this is probably not that significant, but I have definitely seen a shift in the visitors browsers who come to this blog, which in combination with other statistics flying around the web does show a shift in peoples attitude to switching their browser.
Friday, 12 February 2010
Wow , Openoffice 3.2 is extremely fast on Ubuntu 9.10

I have been using Openoffice for years, and while it's compatibility has always been good with other office products, speed has never been one of it's strong suites, but boy has that all changed with this latest release. When you click on the menu item to start the application, even on a machine that is busy, as mine always are, it is near as damn it instantly there. Now you can't get much better than that.
I will also comment that the last release - 3.1.1 - had made moves to getting faster anyway, so it is obviously something the dev's have been looking at.
On Ubuntu it has not made it into the standard repositories to install, so you have to do it manually, which really isn't that dificult.
Basically go to the Openoffice web site HERE and grab the file that contains all the installation files.
Untar this file into your home directories tmp directory and then from a command line change into the directory it creates, which in out case is the DEB's directory and run the command shown below, simples as the Meerkat says ;-)

Now, as we already have Openoffice 3.1.1 installed, setting up an icon to access the program is slightly harder, if you don't remove that version first. I didn't as I wanted to keep both around for now.
So you need to right click on your Applications menu on the task panel, and add a link to the new application manually, like so.

Enjoy
Thursday, 11 February 2010
Chromium adds a slew of new security features to Chromium
While looking through the latest improvements to the latest daily release of Chromium I noticed a whole new page of security management.

Now I have been reading some very foolish and childish FUD around the web about how chromium calls back to the mother ship and tells Google about everything you have ever done and what you are currently drinking. I have have always know this is nonsense, and you can control exactly what goes where if you have more than two brain cells available to you. Just switching in privacy mode is just one such option open to you.
This new screen allows you to control what happens with your cookies,images,Javascript,Plug-ins and Pop-ups, that's right you can tell Chromium never to allow pop-ups. I know Firefox has had most of these for a long time, and they could be more granular, but it really is a great step forward in controlling what your browser can and can't allow.
One other nice touch is the ability to control your Adobe flash plug-in settings which also allows you to protect yourself against some of the new breed of Flash plug-in exploits.
Yes this is a great step forward and one warmly welcomed here.

Now I have been reading some very foolish and childish FUD around the web about how chromium calls back to the mother ship and tells Google about everything you have ever done and what you are currently drinking. I have have always know this is nonsense, and you can control exactly what goes where if you have more than two brain cells available to you. Just switching in privacy mode is just one such option open to you.
This new screen allows you to control what happens with your cookies,images,Javascript,Plug-ins and Pop-ups, that's right you can tell Chromium never to allow pop-ups. I know Firefox has had most of these for a long time, and they could be more granular, but it really is a great step forward in controlling what your browser can and can't allow.
One other nice touch is the ability to control your Adobe flash plug-in settings which also allows you to protect yourself against some of the new breed of Flash plug-in exploits.
Yes this is a great step forward and one warmly welcomed here.
Friday, 25 December 2009
Google Chrome Extensions: Blog This! (by Google)
Google Chrome Extensions: Blog This! (by Google)
I know the Google community have been working hard on many new features for the browser, and in particular is an attempt to emulate the success of Firefox with their extensions.
Well here is one extension that I find is particularly useful, and will keep an eye on it's development over the coming months, as it is still missing a couple of key components like tagging and adding pictures, but I'm sure that this will come shortly.
Even in it's current form it is useful, and it allows you to blog on something that you stumble across on the web.
There are now many useful extensions in the Google repository , not anywhere near as many as in the Firefox library, but already significantly more than other popular browsers.
I also use the book mark syncing utility that is built into Chromium rather than the Linux Beta Chrome, and combined with the extensions you have a very powerful browser and feature complete browser.
Hope you find this extension useful.
I know the Google community have been working hard on many new features for the browser, and in particular is an attempt to emulate the success of Firefox with their extensions.
Well here is one extension that I find is particularly useful, and will keep an eye on it's development over the coming months, as it is still missing a couple of key components like tagging and adding pictures, but I'm sure that this will come shortly.
Even in it's current form it is useful, and it allows you to blog on something that you stumble across on the web.
There are now many useful extensions in the Google repository , not anywhere near as many as in the Firefox library, but already significantly more than other popular browsers.
I also use the book mark syncing utility that is built into Chromium rather than the Linux Beta Chrome, and combined with the extensions you have a very powerful browser and feature complete browser.
Hope you find this extension useful.
Wednesday, 23 December 2009
How to set up your own conference room with Pidgin/XMPP/jabber and Gtalk

While reading through the protocol documentation for the pidgin XMPP implementation, this protocol is the one used for Jabber and Gtalk instant messaging, I came across this easy to follow guide.
How to set up a conference.
Select "Join a Chat" from the buddy list's "Buddies" menu.
Select your XMPP account. - this will be your Gtalk/Jabber account
Fill in the following fields you see.
"Room" should be the short name of the conference. For example, "myconference"
"Server" is the server on which the conference will be created. It must be a MUC server, such as conference.jabber.org. The chat's ID will be Room@server, so the example "myconference" would have the id "myconference@….
"Handle" is the name you wish to be displayed in the chat. It is similar in concept to a nickname on IRC.
"Password" is optional for creating a new room. You probably don't want to fill this field in.
Click "Join."
You will see a dialog asking you about creating the new room. You can either accept the default configuration or configure the room, at your option.
I would recommend just selecting the default to start. Voila you now have conference room you can set up for your family and friends.
I did this using Ubuntu Linux, but Pidgin is cross platform, as is XMPP, so it really doesn't matter what operating system you use.
Monday, 21 December 2009
The Christmas Elves have been busy over at Mozilla towers

I think one of the really bright spots for Linux in 2009 has been the increase in quality browsers for the platform, and at the turn of the year the pace of change and development doesn't appear to have slowed one bit.
We have just had the Beta version of Google Chrome release to the world, and packages are already available for many distributions.
Now Mozilla have not been standing still, and their next release 3.6 has just had a new beta released, and with it the ability to easily integrate the Mozilla personas, basically themes for your browser. Mozilla Personas
I also stumbled across a post on the latest and greatest new features that are going into version 3.7, and one of those, has been in Chromium from the start, and that is tab process separation, which means if one tab freezes the browser won't.
You can only do this with version 3.7, and this how you do it:
type about:config
and then type
dom.ipc.plugins.enabled
and make sure it is set to true.
It works, and I'm playing with it now, so time will tell how stable it is. The smart move from the Mozilla guys, was to use a lot of the code from the Chromium project, so not re-inventing the wheel, wize move.
I'm looking forward to the renewed competition in the new year, as the main beneficiaries are the linux browser community.
Subscribe to:
Posts (Atom)



 Posts
Posts


