
I had to look at an Ubuntu installation the other day that had a problem after it had been upgraded. This problem turned out to be that the friend had previously installed an early version of the Grub boot loader and had not regressed this before the upgrade , an easy mistake to make.
The cure for this is well documented on the web and the solution is to boot your PC with an Ubuntu live CD and mount the harddisk in a chroot jail so we can then play with it and re-install the correct version of Grub. This procedure was taken from the official Ubuntu wiki.
Reinstalling GRUB 2 from LiveCD
If you cannot boot from GRUB 2 and need to reinstall it:
* Boot to the 9.10 Karmic LiveCD Desktop.
* Open a terminal - Applications, Accessories, Terminal.
* Determine your normal system partition - `sudo fdisk -l` (That is a lowercase L)
* If you aren't sure, run `df -Th`. Look for the correct disk size and ext3 or ext4 format.
* Mount your normal system partition:
Code:
sudo mount /dev/sdXX /mnt
o Note: substitue the correct partition: sda1, sdb5, etc.
o Note: GRUB 2 counts the first drive as "0", but the first partition as "1"
* Only if you have a separate boot partition:
o
sudo mount /dev/sdYY /mnt/boot
with sdYY being your /boot partition designation.
* Note: If you have any other system partitions such as "/usr" these should also be mounted in a similar manner.
* Mount devices:
sudo mount --bind /dev/ /mnt/dev
* Chroot into your normal system device:
sudo chroot /mnt
* Reinstall GRUB 2:
sudo grub-install /dev/sdX
*
o Note: Substitute the correct device - sda, sdb, etc. Do ''not'' specify a partition number.
* Verify the install:
sudo grub-install --recheck /dev/sdX
o Note: Substitute the correct device - sda, sdb, etc. Do ''not'' specify a partition number.
* Exit chroot: CTRL-D
* Unmount devices:
sudo umount /mnt/dev
* If you mounted a separate /boot partition:
sudo umount /mnt/boot
* Unmount last device:
sudo umount /mnt
* Reboot.
This procedure had his machine up and running perfectly again in five minutes, but just shows how flexible this live CD is and there are no real limitations to what you can get up to once you have this up and running.
Showing posts with label live CD. Show all posts
Showing posts with label live CD. Show all posts
Sunday, 8 November 2009


Tuesday, 23 June 2009
Using Ubuntu on a USB drive as my PC
I needed to create a portable PC on a USB drive so that I could have all my data and Linux applications with me at all times. The need was driven by having a machine with Windows Vista pre-installed, that I didn't want to change or use, but the BIOS was enabled to boot from any device.
Here are the items I used to create the setup:
1) Copy of Ubuntu 9.04 desktop
2) 1 Kingston Datatraveller II 2 GB disk to use as a live CD installer
3) 1 16GB Kingston Datatraveller disk to use as the "PC on a USB drive"
4) 1 Dell XPS 1330 with Ubuntu installed
Step 1:
I booted into my Dell and clicked on the USB creator and selected the Ubuntu 9.04 iso image
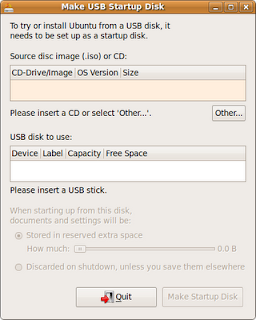 Ubuntu USB Drive Creator
This installed the live Ubuntu CD image onto the 2GB Kinston Datatraveller II ready to be booted from.
Step 2:
Now I put this 2GB Kinston Datatraveller II into one of the USB ports on the Dell XPS and re-booted the machine. The machine now boots off the USB stick, make sure you select your language and to run in live mode, as this allows you access to all of the tools when you want to start to install.
Step 3:
Now place the 16GB Kingston Datatraveller into the other USB slot on the Dell XPS and click on the install icon on the desktop. Everything will be wiped off this USB drive, so make sure you have backed it up . Follow the standard Ubuntu install, but when you get to the disk partitioning, make sure you select the 16GB drive. Be very careful at this stage as you don't want to erase the wrong disk, like your hard drive ;-(. The live CD has the Gparted application available, so you may want to load that up before you start this process and make sure you know which disk is which.
I used the custom disk option and selected the 16GB Kingston Datatraveller, which in my case was /dev/sdc. I only used a single partition, which I formatted ext4, and no swap. It will complain about not having a swap file, but just press continue. This setup is highly unlikely to ever need a swap partition as you are only going to using it for light duties. It would also shorten the life of the USB stick by constantly swapping to it on a machine with little RAM.
Step 4:
The process will continue until you reach a point where you have to press commit, check the details once again and then press Finish. This will format the 16GB Kingston Datatraveller and copy over the operating system.
Voila, you now have an Ubuntu 9.04 PC on a stick. You can store applications and data on there, and it can go where ever you go, very convienient. If you have important data you wish to keep then I would always keep a backup on another data USB stick. Relying on a £30 USB stick to safely store your next million selling SciFi book is not something I would recommend.
I have been using this for months now and have installed Compiz, Google Chromium and Firefox 3.5. The performance has proved to be fine on the following machines:
Dell XPS 1330 3GB Ram
Dell 6400 4GB Ram
Dell D600 1GB Ram
HP DC7700 4GB Ram
HP Pavillion DV9000 2GB Ram
Asus 1000 2GB Ram
Sony Vaio 2GB Ram
Toshiba Sat 1GB Ram
Here are the items I used to create the setup:
1) Copy of Ubuntu 9.04 desktop
2) 1 Kingston Datatraveller II 2 GB disk to use as a live CD installer
3) 1 16GB Kingston Datatraveller disk to use as the "PC on a USB drive"
4) 1 Dell XPS 1330 with Ubuntu installed
Step 1:
I booted into my Dell and clicked on the USB creator and selected the Ubuntu 9.04 iso image
 Ubuntu USB Drive Creator
This installed the live Ubuntu CD image onto the 2GB Kinston Datatraveller II ready to be booted from.
Step 2:
Now I put this 2GB Kinston Datatraveller II into one of the USB ports on the Dell XPS and re-booted the machine. The machine now boots off the USB stick, make sure you select your language and to run in live mode, as this allows you access to all of the tools when you want to start to install.
Step 3:
Now place the 16GB Kingston Datatraveller into the other USB slot on the Dell XPS and click on the install icon on the desktop.
I used the custom disk option and selected the 16GB Kingston Datatraveller, which in my case was /dev/sdc. I only used a single partition, which I formatted ext4, and no swap. It will complain about not having a swap file, but just press continue. This setup is highly unlikely to ever need a swap partition as you are only going to using it for light duties. It would also shorten the life of the USB stick by constantly swapping to it on a machine with little RAM.
Step 4:
The process will continue until you reach a point where you have to press commit, check the details once again and then press Finish. This will format the 16GB Kingston Datatraveller and copy over the operating system.
Voila, you now have an Ubuntu 9.04 PC on a stick. You can store applications and data on there, and it can go where ever you go, very convienient. If you have important data you wish to keep then I would always keep a backup on another data USB stick. Relying on a £30 USB stick to safely store your next million selling SciFi book is not something I would recommend.
I have been using this for months now and have installed Compiz, Google Chromium and Firefox 3.5. The performance has proved to be fine on the following machines:
Dell XPS 1330 3GB Ram
Dell 6400 4GB Ram
Dell D600 1GB Ram
HP DC7700 4GB Ram
HP Pavillion DV9000 2GB Ram
Asus 1000 2GB Ram
Sony Vaio 2GB Ram
Toshiba Sat 1GB Ram
Subscribe to:
Posts (Atom)



 Posts


