There is no doubt about it , the younger digital natives think Microsoft is the company of their parents, the tool they used for work and it's boring and out dated. This reasoning has taken a long time to come about, but with Apple ,Google and Linux constantly chipping away at the thinking that you need Microsoft to do anything it has finally taken hold, and I think for Redmond it is going to get a lot worse.
You don't have to look far to see the signs of this , with young people using smartphones far more often than they use any other form of IT device. When they do turn to a laptop, they would prefer to use an Apple or Tablet than anything else. Windows 8 has not been the huge success it was supposed to be, and the Windows 8 Phone has been a complete flop plus the ARM based tablet has been slow to sell. To be honest , in a group of young people you will never see one in action, perhaps just the older IT users. That is part of the problem Microsoft is now seen as the old peoples platform , it's not what younger people want.
Now with the introduction of Bring Your Own Device - BYOD - into the corporate environment, Microsoft has never seen such pressure. People want to use their iPhone and Android phones to access the company data, and their tablets need to work too. They are far more likely to own an Apple, and these need to access the company network and data too. In the past they were given whatever the company wanted, normally with Microsoft , and they just used it. This is now not the case in a lot of cases, so people will not be forced to use anything they don't like.
An increasing large number of people are getting there work done, with the iPhone, iPad, Galaxy S III Android phone. I happily use Ubuntu Linux on the desktop, an iPad and an Android phone , with no Microsoft in sight. This is partly due to the switch to cloud based applications and the market dominance now of Google Chrome and Firefox. These are desktop platform neutral so you can run them on virtually anything. The availability of good apps on the other platforms that let you get work done has also increased, and will continue to become more compelling.
Some analysts are calling this the post PC era, and I can see for a large part of the population that is now true, and will increase. New tablet devices arrive almost daily from India and China at ever reduced prices, and Google is bringing the price of laptops down to rock bottom prices with Google Chromebooks. Smartphones are getting bigger screens and more powerful with each iteration, I can see docking stations for these devices becoming more popular.
The future will be different to what we have known in IT, and Microsoft will be playing a significantly reduced role in it. This is great, as I have never liked their monopoly , and active competition is good for the consumer.
Wednesday, 28 November 2012
Wednesday, 15 August 2012
Using puppet with Virtualbox to speed up client additions install
One of the first things you need to do when you create a new VM is install the client additions code, which offers enhanced networking,screen sizing, cut & paste and general host/client integration. With Centos 6.3 Live CD installs , several of the needed rpm packages that allow the install are missing.
I have a puppet master installed and configured - which is beyond the scope of this post - but if you need help doing that, then just buy or download the Pro Puppet book, which covers this topic very clearly for any operating system.
Pro Puppet book
Make sure every machine can resolve all DNS entries properly , either with a DNS server or by hosts files - if you must. Every machine needs to resolve puppet.mynetwork.com and puppet.
You also need to install ruby , ruby-libs ,ruby-shadow , puppet and facter or you won't be able to connect to the puppet master in the first place. You can do this as part of your post-install kickstart or manually. You will also need to add the Fedora mainatained EPEL repo to get the latest versions of these.
The important elements that you need to install are make, gcc and kernel-devel and I also always add vim.
You need to define each of these in the modules sections under /etc/puppet/modules on the puppet master with their own directory structure of:
/etc/puppet/modules/make/files
/etc/puppet/modules/make/manifests
/etc/puppet/modules/make/templates
Within the manifests directory you need to add an init.pp, and for vim it will look like this:
class vim {
package { vim-enhanced:
ensure => present,
}
}
You can obviously do a lot more in these files, but this is just to show what is needed for this task.
You also need to make sure you include these modules in the node.pp file in the /etc/puppet/manifests directory. Like this:
node /^testmac\d+\.mynetwork\.com/ {
include vim
include make
include kernel-devel
include gcc
}
The guest server in my environment follows this naming scheme and the regular expressions allow you to have as many as you like.
To connect your new VM to the puppetmaster you can run the following command and make sure that the certificate is allowed on the server:
puppet agent --server=puppet.mynetwork.com --no-daemonize --verbose
Once the client server has the cert's installed correctly, then run this command again to auto install all the rpms needed for you to install the client additions. The client additions can be installed from the GUI or the command line, which ever you prefer.
You can now also manage all your VM's with puppet , and make your virtual dev/test environment a lot easier to manage.
Monday, 18 June 2012
Putting VNC traffic through an SSH tunnel
While setting up ssh tunnels has become a useful way to get work done securely on the command line, there are occasions when a GUI is required. Enter the really useful VNC protocol for being able to remotely access a Linux machines X windows system.
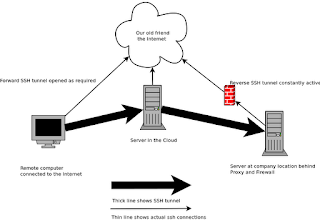
So how is this done, well I think a little diagram will help to explain the idea, and then some steps to get it done.
Well, how do we get this done. Read my previous article on how to set up tunnels using SSH, and once you have that up and running we can set up the VNC servers. Using Centos 6.2 as the server to connect to internally, running Gnome, install Tigervnc server and edit the /etc/sysconfig/vncservers and set your X session size, display port numbers and we wish to tell it to listen only to localhost. This is for security, we don't want it to respond to VNC on the actual IP address of the server.
Host ext.server*
#HostName ext.server
User joeblogs
UserKnownHostsFile ~/.ssh/known_hosts.d/companyx
LocalForward 5901 localhost:5901
ProxyCommand ssh -A server.in-the-cloud exec nc localhost 10022
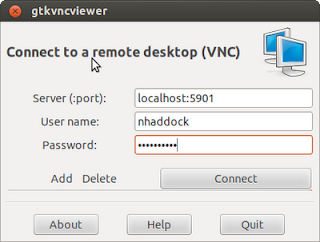
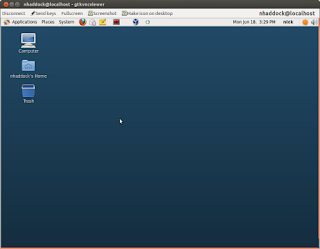
The key things to take away from this config, is that you need to add an entry in your /etc/hosts file for the ext.server IP address. We are going to forward all traffic for VNC - port 5901 into the tunnel once it is established using Localforward, and the proxy command uses netcat (nc) to push all the traffic down the reverse tunnel port it will find from your previous set-up with the reverse tunnel. So now just ssh to ext.server, and once you have made your connections, use a VNC viewer to connect to localhost on port 5901, and voila you now have an X session on the internal server.
Here are some pictures of the outcome.
Well, how do we get this done. Read my previous article on how to set up tunnels using SSH, and once you have that up and running we can set up the VNC servers. Using Centos 6.2 as the server to connect to internally, running Gnome, install Tigervnc server and edit the /etc/sysconfig/vncservers and set your X session size, display port numbers and we wish to tell it to listen only to localhost. This is for security, we don't want it to respond to VNC on the actual IP address of the server.
Example:Start the vncserver , which will now be listening on port 5901 on localhost. Next off to the remote machine, where we need to set up the SSH config file so that it tunnels all VNC traffic through the SSH tunnel Go into .ssh/config and add the following for the remote user/machine
VNCSERVERS="1:nhaddock"
VNCSERVERARGS[1]="-geometry 1024x768 -localhost"
Host ext.server*
#HostName ext.server
User joeblogs
UserKnownHostsFile ~/.ssh/known_hosts.d/companyx
LocalForward 5901 localhost:5901
ProxyCommand ssh -A server.in-the-cloud exec nc localhost 10022
The key things to take away from this config, is that you need to add an entry in your /etc/hosts file for the ext.server IP address. We are going to forward all traffic for VNC - port 5901 into the tunnel once it is established using Localforward, and the proxy command uses netcat (nc) to push all the traffic down the reverse tunnel port it will find from your previous set-up with the reverse tunnel. So now just ssh to ext.server, and once you have made your connections, use a VNC viewer to connect to localhost on port 5901, and voila you now have an X session on the internal server.
Here are some pictures of the outcome.
Labels:
linux,
open source,
openssh,
ssh tunneling,
vnc,
vpn
Sunday, 15 April 2012
eSATA , Thunderbolt or USB3, that is the question?
As with all things technological , when a standard comes to the end of it's life there will always be more than one way to move forward.
So it is with the demise of USB2 and Firewire, which have basically come to the end of their usefulness, when you look at the size of the external disks we now have , and the size of the data that we wish to move around.
There are three contenders that I can currently see to replace these, and they are USB3, eSATA and Thunderbolt. Now I think that Thunderbolt is a great technology and offers the best performance without a doubt, but currently it only seems to be getting traction in the Apple world, where even here external disk drives are thin on the ground. To compound this scarcity of choices is the fact I live in a multi-machine world, where I have to move data between many machines, which include mainly Linux and even the odd Windows VM.
The PC manufacturers do not seem interesting in this new interface yet, I hope this changes, but I have to deal with the here and now and not what I would like to happen.
I initially started using eSATA as my laptop supported it, and it was reasonably fast and I could run VM's directly from this drive - using a hybrid disks - but it has a big hole in it's usefulness, not every machine has one of these ports, and it is not compatible with anything else. USB3 on the other hand is completely backwardly compatible, and this is where it really wins, as I can use USB3 where I have it , and it can switch back to USB2 when it is not. This has proved more than useful on many occasions while moving files around.I have also noticed that more and more motherboard manufacturers are supporting it, and once it becomes a standard on laptops, then to my mind it is game over. I now see eSATA as more of a bridging technology that became popular due to the absence of the the new USB3 standard.
So with this in mind I have just bought a USB3 PCI-e adapter for my older Desktop server, and I will now compare this performance to the ESATA I have in the laptop and see how I get on. All the benchmark data I have read lead me to believe it will be significantly faster, as it's speed is closer to the 6GB SATA III than the 1.5GB SATA speeds I currently have in the laptop. I will report back.
I always feel on these technology change overs that you need to be careful, so that you make sure you cover your bases and examine the alternatives, but need to make sure your not left holding the new Betamax technology.Anyone still own an HD player when you now wish you had a Blueray player?
There is one other part of the jigsaw that I will right a separate post about, and that is a the filesystem to use to make the external disk truly portable between Mac, Linux and Windows.
Saturday, 4 February 2012
The power and felixibility of OpenSSH tunneling in the cloud
If you didn't realise it, the secure shell that is used every day, all over the internet is written and managed by the OpenBSD project team, and we all owe them a huge debt of thanks for their efforts. It lets us communicate securely with our servers and other devices.
Well, one of the great features of ssh , is the ability to set up tunnels , that you can use to connect traffic across , and indeed reverse tunnels which can be very useful for connecting to remote servers.
As this tool has become so ubiquitous, there are other tools that have been built around it, and some examples of these are autossh, which allows you keep a tunnel monitored and open for when you need it. Also corkscrew , which allows you to connect to remote hosts by encapsulating you traffic in https packets, thus cutting holes through proxies.
When these are combined you have the ability to connect to remote hosts, hidden behind corporate firewalls and proxies, so that you can get some work done.
Here is an example. I have a servers than can connect to all the internal network, but you can't get to this server externally, but is has access to a proxy.
Firstly you set up it's ssh config file so that it can talk through the proxy, and then you create a reverse tunnel to a machine in the cloud. You then use autossh to manage that link, so that when you need to use it , it is available.
There are so many variables in this that covering them all is not feasible, but here is an example:
First, make sure that the ssh public keys for both servers have been put into the authorized_keys file in .ssh on the other machines. Swap public keys, in other words.
Configure you .ssh/config for the user to include the following parameters
TCPKeepAlive yes
ServerAliveInterval 270
ProxyCommand /usr/bin/corkscrew 192.168.2.1 8080 %h %p
Where 192.168.2.1 is the IP of your proxy and 8080 is the port it listens on
So when we make the connection to the cloud servers, it will use this encapsulation.
Now we create the tunnel
/usr/bin/autossh -M 29001 -f -nN -R 1102:localhost:10000 billblogs@cloud01.tangerine.co.uk
Ok, lets break the command down
autossh uses -M to specify it's keep alive port, and -f to place the job in the background.
ssh uses the -nN and -R to say this is going to be a reverse tunnel, and on the cloud server it will open port 1102 and connect it to port 10000 on the internal server running the ssh daemon that we start this job from. In other words, the sshd daemon on the internal server is listening on port 10000.
So, once this is all configured, you can go to your cloud server, connect on port 1102, and it will be as if you were sat at your desk, voila
Here is the command you would use to connect:
ssh -p 1102 billbloggs@localhost
NB You need to make these connections as secure as possible, and disable root logins and only allow keys.
Subscribe to:
Posts (Atom)